Unlocking the arcane realm of mechanics, where intricate circuits blend and currents conspire, we delve into the captivating concept of “dual battery isolator wiring diagram.” Much like a cryptic puzzle waiting to be decoded, this enthralling blueprint illuminates the path towards harnessing the power of two batteries, seamlessly merging them into a harmonious symphony of electricity. With a dash of creativity and a sprinkle of neutrality, we embark on a quest to unravel the secrets of this perplexing web of cables and connections. Prepare to be captivated by the world of dual battery isolator wiring diagrams – where circuits dance, electrons sing, and mechanics fuse to forge a masterpiece of electrifying ingenuity.
v
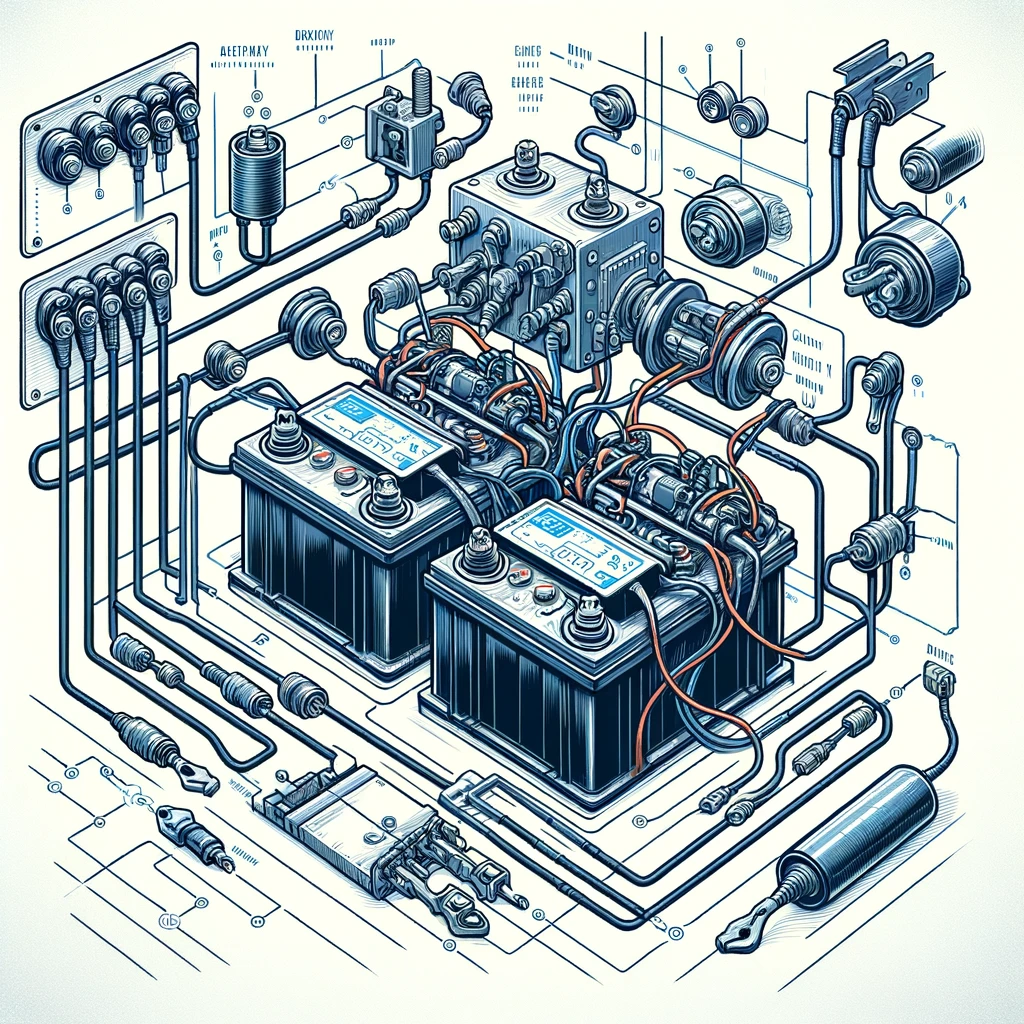
Breakdown of the Dual Battery Isolator Wiring Diagram
In this comprehensive guide, we will dive into all the nitty-gritty details of understanding the dual battery isolator wiring diagram, unraveling its mysteries and making it crystal clear for you.
1. Primary Battery
In the dual battery isolator setup, the primary battery plays a crucial role as the main power source for your vehicle. It is typically the battery that came with your vehicle from the factory and is responsible for running the engine and powering various electrical components.
2. Auxiliary Battery
The auxiliary battery, on the other hand, is an additional battery you install to power various accessories, such as a fridge, camping lights, or a sound system. It is isolated from the primary battery to prevent draining power from the primary battery when the engine is not running.
3. Dual Battery Isolator
The dual battery isolator acts as the gatekeeper between the primary and auxiliary batteries. It allows the flow of current from the alternator to charge both batteries, while ensuring they remain isolated when one battery is discharged or the vehicle is turned off.
4. Alternator
The alternator is responsible for generating electricity and charging the batteries while the engine is running. It is connected to the dual battery isolator, which in turn distributes the charging current to both the primary and auxiliary batteries.
5. Battery Switches
Battery switches provide manual control over the charging and discharging processes of the dual battery setup. They allow you to select which battery to use, whether to charge both simultaneously, or isolate one battery when needed.
6. Fuse Protection
Adding a fuse protection mechanism to the wiring diagram is highly recommended to safeguard your electrical system from potential electrical faults or short circuits. Fuses act as safety devices and prevent excessive current from damaging the batteries or other components.
7. Wiring Connections
Proper wiring connections are crucial for a safe and efficient dual battery isolator setup. It is essential to follow the manufacturer’s instructions and wire the system correctly, ensuring the right gauge of wires, appropriate connectors, and sturdy grounding.
8. Voltage Sensing Relay
A voltage sensing relay (VSR) is often used in dual battery isolator setups to automatically sense the voltage of the primary battery. When the voltage reaches a certain threshold, the VSR engages, allowing current to flow from the alternator and charge the auxiliary battery.
9. Monitoring and Maintenance
Regularly monitoring the state of both batteries and performing routine maintenance is essential to ensure the longevity and optimal performance of your dual battery system. This includes checking voltage levels, cleaning terminals, and keeping an eye out for any signs of deterioration.
Conclusion
Understanding the dual battery isolator wiring diagram empowers you to effectively harness the power of multiple batteries in your vehicle. The comprehensive guide provided here should equip you with the knowledge and confidence to plan, install, and maintain a reliable dual battery setup for your specific needs.
Deciphering the Basics: Exploring the Key Components in a Dual Battery Isolator Wiring Diagram
- Dual battery isolator: This is the heart of the wiring diagram and acts as the main control unit. It ensures that power is evenly distributed between the primary battery and the secondary battery, allowing for efficient charging and discharging.
- Primary battery: Acting as the powerhouse, the primary battery is responsible for supplying power to the vehicle’s systems and accessories. It is connected to the dual battery isolator through a dedicated cable.
- Secondary battery: The secondary battery acts as a backup power source or can be used to power specific devices. It is also connected to the dual battery isolator and can be charged simultaneously with the primary battery.
- Alternator: The alternator plays a crucial role in charging both batteries. It converts mechanical energy from the engine into electrical energy, which is then distributed to the primary battery and the secondary battery through the dual battery isolator.
- Isolation relay: This component allows for seamless switching between the primary battery and the secondary battery. It ensures that power flows in the appropriate direction, preventing any possible discharge or overload.
- Ignition switch: The ignition switch controls the activation of the dual battery isolator system. When the switch is turned on, it allows for charging and discharging of the batteries, ensuring smooth operation.
Understanding the key components in a dual battery isolator wiring diagram is crucial for optimizing power distribution and ensuring a reliable electrical system. Each component has a unique function, working in harmony to provide an efficient power supply for your vehicle.
Ensuring Optimal Performance: Essential Tips for Properly Installing a Dual Battery Isolator Wiring Diagram
Why Proper Installation of a Dual Battery Isolator Wiring Diagram Matters
When it comes to optimizing the performance of your vehicle’s electrical system, a properly installed dual battery isolator wiring diagram is key. Not only does it ensure smooth operation, but it also enhances the overall efficiency of your dual battery setup.
Essential Tips for Installation:
1. Quality Components:
- Invest in high-quality dual battery isolator and wiring components to ensure reliability and longevity.
- Choose thick gauge wiring that can handle the maximum amperage of your system for optimal performance and safety.
2. Adequate Grounding:
- Ensure proper grounding by securely connecting the negative terminal of both batteries to the vehicle’s chassis.
- Minimize corrosion risks and maintain good conductivity by using corrosion-resistant connectors.
3. Optimized Battery Placement:
- Install both batteries in a location that allows for adequate ventilation and protects them from extreme temperatures.
- Place batteries as close to each other as possible to minimize wiring length and reduce voltage drop.
4. Suitable Fuse Protection:
- Install fuses or circuit breakers between the batteries, isolator, and any other connected devices to prevent electrical faults and potential damage.
- Choose the appropriate fuse size based on the system’s maximum current draw.
5. Attention to Detail:
- Double-check all connections and ensure they are tight, secure, and free from any loose strands or frayed wires.
- Always follow the manufacturer’s instructions and wiring diagram to avoid any mistakes.
- Consider consulting a professional if you’re unsure about any aspect of the dual battery isolator installation.
By adhering to these tips and guidelines, you can achieve an optimized dual battery system that guarantees reliable performance and efficient power management. Proper installation not only safeguards your vehicle but also enables you to tackle any adventure without worrying about battery drain. Remember, attention to detail during the installation process is the key to unlocking the full potential of your dual battery setup.
Making Informed Choices: Top Recommendations for Selecting the Right Dual Battery Isolator Wiring Diagram
• Simplify your setup with a reliable dual battery isolator wiring diagram that suits your needs.
• Start by understanding the different types of dual battery isolator systems available in the market. Familiarize yourself with automatic, manual, and electronic isolator options, each offering unique features.
• Consider the size and power requirements of your dual battery setup. Ensure that the wiring diagram you choose supports the voltage and amperage required to efficiently operate your equipment.
• Assess your knowledge and abilities when it comes to electrical systems. If you’re a DIY enthusiast and comfortable with complex wiring, a detailed wiring diagram with labeled connections may be suitable. However, if you prefer simplicity, go for a diagram that provides a straightforward overview of the installation process.
• Research reputable brands and manufacturers known for producing high-quality dual battery isolator systems. Look for customer reviews and ratings to gauge user satisfaction and reliability.
• Consider the overall cost of the wiring diagram, ensuring it fits within your budget without compromising on quality.
• Explore additional features or accessories that may complement your dual battery setup, such as voltage sensing relays or battery monitors.
• Seek professional advice or consult an expert if you’re unsure about any aspect of the wiring diagram or installation process. Ensuring your dual battery system is installed correctly is vital for optimal performance and longevity.
• Don’t forget to prioritize safety. Always follow the recommended safety precautions mentioned in the wiring diagram and utilize appropriate tools and equipment during installation.
Q&A Dual Battery Isolator Wiring Diagram
What is a dual battery isolator wiring diagram?
A dual battery isolator wiring diagram is a visual representation of how to connect a dual battery system in a vehicle using an isolator. It provides guidance on the proper wiring connections and configurations for the system to function effectively.
Why is a dual battery system useful?
A dual battery system is useful because it allows you to power additional accessories or equipment in your vehicle without draining the main starting battery. It ensures that you always have a backup power supply for essential functions like running a fridge, lights, or a camping setup.
What is an isolator?
An isolator is an electrical device used in a dual battery system to prevent power from flowing between the two batteries. It ensures that the auxiliary battery receives a charge from the vehicle’s alternator while protecting the starting battery from being drained.
Why is a wiring diagram necessary for installing a dual battery system?
A wiring diagram is necessary because it provides a clear and organized visual representation of the wiring connections required for a dual battery system. It helps ensure that the installation process is done correctly, reducing the risk of complications or damage to the vehicle’s electrical system.
What are the components typically shown in a dual battery isolator wiring diagram?
Components typically shown in a dual battery isolator wiring diagram include the main starting battery, auxiliary battery, isolator, alternator connection, ground connection, and connections to various accessories or equipment.
Are dual battery isolator wiring diagrams universal?
No, dual battery isolator wiring diagrams are not universal as they can vary depending on the specific vehicle make, model, and the type of isolator being used. It is crucial to refer to the appropriate wiring diagram for your specific dual battery system installation.
Where can I find a dual battery isolator wiring diagram for my vehicle?
There are several resources available to find a dual battery isolator wiring diagram for your specific vehicle. These include the vehicle’s owner’s manual, online forums, manufacturer websites, or consulting a professional automotive electrician.
What are some important considerations when using a dual battery system?
Some important considerations when using a dual battery system include ensuring the appropriate battery size and capacity for your needs, using quality wiring and connectors, regular maintenance of the batteries, and monitoring the battery voltage to prevent over-discharging.
Can I install a dual battery system myself?
While it is possible to install a dual battery system yourself, it is recommended to have some knowledge of automotive electrical systems. If you have any doubts or lack experience, it is advisable to consult a professional to ensure a safe and correct installation.
Is it necessary to follow the wiring diagram exactly?
Yes, it is essential to follow the wiring diagram exactly to ensure the proper functioning of the dual battery system. Any deviations from the diagram may result in incorrect connections, potential damage to the vehicle’s electrical system, or increased risk of electrical faults.
To Conclude
And there you have it, a comprehensive guide to understanding the dual battery isolator wiring diagram. We’ve navigated through the intricate web of wires and connections, unlocking the secret behind the seamless operation of two batteries in harmony. By carefully dissecting the diagram, we’ve revealed the hidden pathways that ensure your electrical system works flawlessly, whether you’re powering up multiple accessories or safeguarding your emergency backup power.
With this newfound knowledge, you are now equipped to conquer any wiring obstacle that comes your way. The concept of dual battery systems may have seemed daunting at first, but we’ve dismantled the complexity and laid it out before you in a clear and concise manner.
Remember, keeping your batteries isolated yet synchronized is the key to maximizing their efficiency and longevity. Whether you’re an avid adventurer hitting the open road or a dedicated camper seeking peace and tranquility in the wilderness, understanding the intricacies of the dual battery isolator wiring diagram is paramount.
So, arm yourself with the tools of knowledge and venture forth into the realm of dual battery systems with confidence. Let the wiring diagram serve as your trusty compass, guiding you through the wilderness of electrifying possibilities, ensuring that your power supply remains steady and reliable, whatever you may encounter.
Always exercise caution and diligence, taking the necessary safety precautions when dealing with electrical systems. And remember, at the heart of it all, the dual battery isolator wiring diagram stands as a testament to human ingenuity and innovation in the realm of power management.
May your batteries stay charged, your connections remain strong, and your adventures be electrifying. Until next time, farewell, fellow explorers, as we depart on our separate paths, knowing that we have bridged the gap between confusion and understanding in the world of dual battery isolator wiring diagrams.

A Boston University Electrical Engineering graduate.
Electronics designer for EV giants like Tesla, BMW, VW, and Ford.
Enthusiastic Wikipedia moderator in the automotive category and author of automotive articles.
Passionate about tech, travel, and cars.


